django-dash
django-dash (later on named Dash) is a customisable, modular dashboard
application framework for Django.
Dash allows users to create their own custom dashboards. Supports theeming (in Dash themes are called layouts) and multiple workspaces. Dash comes with extensive pythonic API which allows developers to create new Dash plugins, as well as to modify bundled ones.
To make a clearer association, think of Android for tablets (shortcuts, widgets and apps) or Windows 8 for tablets or desktops.
Dash inherits all those concepts and makes it possible to implement a dashboard system for Django applications with minimal efforts.


Prerequisites
- Django 2.2, 3.0 and 3.1
- Python 3.6, 3.7, 3.8 and 3.9.
Key concepts
- Each layout (theme) consist of placeholders. Each plugin widget has its’ own specific HTML/JavaScript/CSS.
- There might be multiple themes implemented and installed. Default layout is chosen system wide, but each user (if has an appropriate permission) can choose his preferred layout over all workspaces or even different layouts per workspace.
- Placeholder is a space, in which the plugin widgets are placed.
- Placeholders are rectangles consisting of cells. Each placeholder has its’ own custom number of rows and columns.
- Workspace is just another named dashboard. Users switch between workspaces in navigation. Amount of workspaces is unlimited.
- Plugin is a (Django) micro app. Most heavy work should happen in plugin. Plugin may have its’ own views, urls, etc. Rendering happens with use of plugin widgets.
- Plugin widgets are mainly responsible for rendering of the plugin data. Each plugin widget has its’ own specific HTML/JavaScript/CSS. A single plugin widget is registered for a triple (layout, placeholder, plugin).
- Public dashboard (implemented as a contrib app, which makes it optional) allows users to make their workspaces public. If user chooses to make his dashboard public, default workspace becomes public. As for non-default workspaces, user can still make each of them private or public.
Main features
- Customisable layouts (aka theming).
- Multiple workspaces.
- Tunable access permissions to plugins.
- Public dashboards (as a contrib app).
- Cloneable workspaces. It’s possible to clone entire workspace, including all the plugins into another workspace.
- Copy/paste functionality for plugin widgets.
FAQ
Question: Is it possible to have Dash working with a (pick what’s applicable: D3, Polychart2, or some other library for making charts).
Answer: Yes. Check the source code of the following sample plugins:
Demo
Live demo
See the live demo app on Heroku.
Credentials:
- username: test_user
- password: test_user
See the public dashboard of a test_demo_user to get an idea of what it could become.
Run demo locally
In order to be able to quickly evaluate the django-dash, a demo app (with a quick installer) has been created (works on Ubuntu/Debian, may work on other Linux systems as well, although not guaranteed). Follow the instructions below for having the demo running within a minute.
Grab the latest django_dash_example_app_installer.sh:
wget https://raw.github.com/barseghyanartur/django-dash/stable/examples/django_dash_example_app_installer.sh
Assign execute rights to the installer and run the
django_dash_example_app_installer.sh:
chmod +x django_dash_example_app_installer.sh

./django_dash_example_app_installer.sh
Open your browser and test the app.
Dashboard:
- URL: http://127.0.0.1:8001/en/dashboard/
- Admin username: test_admin
- Admin password: test
Django admin interface:
- URL: http://127.0.0.1:8001/en/administration/
- Admin username: test_admin
- Admin password: test
If quick installer doesn’t work for you, see the manual steps on running the example project.
Take a look at the templates in “example/example/templates” directory for getting a better idea of how to transform your own or third-party templates into Dash templates.
Also, the example project has example layouts, plugins and widgets implemented. Take it as a good example of how to add widgets for existing plugins to your own custom layout. Make sure to see how same is done for the bundled layouts.
Installation
Install latest stable version from PyPI:
pip install django-dash
Or latest stable version from GitHub:
pip install https://github.com/barseghyanartur/django-dash/archive/stable.tar.gz
Or latest stable version from BitBucket:
pip install https://bitbucket.org/barseghyanartur/django-dash/get/stable.tar.gz
Add dash to
INSTALLED_APPSof the your projects’ Django settings. Furthermore, all layouts and plugins to be used, shall be added to theINSTALLED_APPSas well.INSTALLED_APPS = ( # ... 'dash', 'dash.contrib.layouts.android', 'dash.contrib.layouts.bootstrap2', 'dash.contrib.layouts.windows8', 'dash.contrib.plugins.dummy', 'dash.contrib.plugins.image', 'dash.contrib.plugins.memo', 'dash.contrib.plugins.rss_feed', 'dash.contrib.plugins.url', 'dash.contrib.plugins.video', 'dash.contrib.plugins.weather', # ... )
Make sure that
django.core.context_processors.requestis inTEMPLATE_CONTEXT_PROCESSORS.Add necessary URL patterns to your
urlsmodule.re_path(r'^dashboard/', include('dash.urls')),
Additionally, add all URLs of any Dash apps or plugins
# django-dash RSS contrib plugin URLs:
re_path(r'^dash/contrib/plugins/rss-feed/',
        include('dash.contrib.plugins.rss_feed.urls')),

# django-dash public dashboards contrib app:
re_path(r'^', include('dash.contrib.apps.public_dashboard.urls')),
Creating a new layout
Dash comes with several bundled layouts. Do check their source code as example.
Let’s say, our imaginary layout has two placeholders. One large placeholder for
all kinds of widgets (called main) and a tiny one for shortcuts (called
shortcuts).
Placeholder main:
- Single cell size : 150 x 110 pixels
- Dimensions : 6 cols, 5 rows
Placeholder shortcuts:
- Single cell size : 60 x 55 pixels
- Dimensions : 1 cols, 10 rows
See the figure below to get an idea of what placeholders are:
- Placeholder
mainconsts of cells from 11 to 56. - Placeholder
shortcutsconsists of cells from 1 to 10.
A single plugin widget may occupy one or more cells. Plugin widgets are rectangles.
To make it clear, see following cases:
- Plugin widget has 2 cols and 1 row. Then, for example, it may occupy cells (11 and 12).
- Plugin widget has 2 cols and 2 rows. Then, for example, it may occupy cells (11, 12, 21 and 22).
- Plugin widget has 1 col and 3 rows. Then, for example, it may occupy cells (11, 21 and 31).
- Plugin widget has 4 cols and 3 rows. Then, for example, it may occupy cells (22, 23, 24, 25, 32, 33, 34, 35, 42, 43, 44 and 45).
                                ``main``                               ``shortcuts``
┌───────────┬───────────┬───────────┬───────────┬───────────┬───────────┐ ┌─────┐
│           │           │           │           │           │           │ │  1  │
│           │           │           │           │           │           │ │     │
│    11     │    12     │    13     │    14     │    15     │    16     │ ├─────┤
│           │           │           │           │           │           │ │  2  │
│           │           │           │           │           │           │ │     │
├───────────┼───────────┼───────────┼───────────┼───────────┼───────────┤ ├─────┤
│           │           │           │           │           │           │ │     │
│           │           │           │           │           │           │ │  3  │
│    21     │    22     │    23     │    24     │    25     │    26     │ ├─────┤
│           │           │           │           │           │           │ │  4  │
│           │           │           │           │           │           │ │     │
├───────────┼───────────┼───────────┼───────────┼───────────┼───────────┤ ├─────┤
│           │           │           │           │           │           │ │     │
│           │           │           │           │           │           │ │  5  │
│    31     │    32     │    33     │    34     │    35     │    36     │ ├─────┤
│           │           │           │           │           │           │ │  6  │
│           │           │           │           │           │           │ │     │
├───────────┼───────────┼───────────┼───────────┼───────────┼───────────┤ ├─────┤
│           │           │           │           │           │           │ │     │
│           │           │           │           │           │           │ │  7  │
│    41     │    42     │    43     │    44     │    45     │    46     │ ├─────┤
│           │           │           │           │           │           │ │  8  │
│           │           │           │           │           │           │ │     │
├───────────┼───────────┼───────────┼───────────┼───────────┼───────────┤ ├─────┤
│           │           │           │           │           │           │ │     │
│           │           │           │           │           │           │ │  9  │
│    51     │    52     │    53     │    54     │    55     │    56     │ ├─────┤
│           │           │           │           │           │           │ │ 10  │
│           │           │           │           │           │           │ │     │
└───────────┴───────────┴───────────┴───────────┴───────────┴───────────┘ └─────┘
There are some rules/guidelines you should follow.
Let’s assume that layout is named example. The layout directory should then
have the following structure.
path/to/layout/example/
├── static
│   ├── css
│   │   └── dash_layout_example.css # Contains layout-specific CSS
│   ├── images
│   └── js
│       └── dash_layout_example.js # Contains layout specific JavaScripts
├── templates
│   └── example
│       ├── edit_layout.html # Master edit layout
│       └── view_layout.html # Master view layout
├── __init__.py
├── dash_layouts.py # Where layouts and placeholders are defined and registered
├── dash_plugins.py # Where layout specific plugins and plugin widgets are defined and registered
└── dash_widgets.py # Where layout specific plugin widgets are defined
Layout and placeholder classes should be placed in the dash_layouts.py
file.
Each layout should be put into the INSTALLED_APPS of your Django projects’
settings.py module.
INSTALLED_APPS = (
    # ...
    'path.to.layout.example',
    # ...
)
path/to/layout/example/dash_layouts.py
Step by step review of a how to create and register a layout and placeholders.
Note, that Dash auto-discovers your layouts by name of the file
dash_layouts.py. The module, in which the layouts are defined, has to be
named dash_layouts.py.
Required imports.
from dash.base import BaseDashboardLayout, BaseDashboardPlaceholder
from dash.base import layout_registry
Defining the Main placeholder.
class ExampleMainPlaceholder(BaseDashboardPlaceholder):

    uid = 'main'  # Unique ID of the placeholder.
    cols = 6  # Number of columns in the placeholder.
    rows = 5  # Number of rows in the placeholder.
    cell_width = 150  # Width of a single cell in the placeholder.
    cell_height = 110  # Height of a single cell in the placeholder.
Defining the Shortcuts placeholder.
class ExampleShortcutsPlaceholder(BaseDashboardPlaceholder):

    uid = 'shortcuts'  # UID of the placeholder.
    cols = 1  # Number of columns in the placeholder.
    rows = 10  # Number of rows in the placeholder.
    cell_width = 60  # Width of a single cell in the placeholder.
    cell_height = 55  # Height of a single cell in the placeholder.
Defining and registering the Layout.
class ExampleLayout(BaseDashboardLayout):

    uid = 'example'  # Layout UID.
    name = 'Example'  # Layout name.

    # View template. Master template used in view mode.
    view_template_name = 'example/view_layout.html'

    # Edit template. Master template used in edit mode.
    edit_template_name = 'example/edit_layout.html'

    # All placeholders listed. Note, that placeholders are rendered in the
    # order specified here.
    placeholders = [ExampleMainPlaceholder, ExampleShortcutsPlaceholder]

    # Cell units used in the entire layout. Allowed values are: 'px',
    # 'pt', 'em' or '%'. In the ``ExampleMainPlaceholder`` cell_width is
    # set to 150. It means that in this particular case its' actual width
    # would be `150px`.
    cell_units = 'px'

    # Layout specific CSS.
    media_css = ('css/dash_layout_example.css',)

    # Layout specific JS.
    media_js = ('js/dash_layout_example.js',)

# Registering the layout.
layout_registry.register(ExampleLayout)
HTML templates
You custom layout should be inherited from base layout templates (view or edit). Both view and edit layouts share a lot of things, still edit layout is a bit more “heavy”.
- view_layout.html should inherit from “dash/layouts/base_view_layout.html”.
- edit_layout.html should inherit from “dash/layouts/base_edit_layout.html”.
Both “dash/layouts/base_view_layout.html” and “dash/layouts/base_edit_layout.html” inherit from “dash/layouts/base_layout.html”, which in its’ turn inherits from “dash/base.html”.
Note, that when rendered to HTML, each Dash template, gets a body class
“layout” + layouts’ unique identifier (UID). So, the ExampleLayout
layout would automatically get the class “layout-example”.
<body class="layout-example">
In case of Android layout (UID “android”) it would be as follows.
<body class="layout-android">
Base your layout specific custom CSS on presence of those classes.
Same goes for Placeholders. Each placeholder gets id_ + placeholders’ UID
and the classes “placeholder” and “placeholder-” + placeholders’ UID. So, the
ExampleMainPlaceholder would look as follows.
<div id="id_main" class="placeholder placeholder-main">
And the ExampleShortcutsPlaceholder placeholder would look as follows.
<div id="id_shortcuts" class="placeholder placeholder-shortcuts">
Same goes for plugin widgets. Apart from some other classes that each plugin widget would get for positioning, it gets the “plugin” and “plugin-” + plugin UID. See the following example (for the plugin Dummy with UID “dummy”). Each plugin also gets an automatic UID on the moment when rendered. In the example below it’s the “p6d06f17d-e142-4f45-b9c1-893c38fc2b01”.
<div id="p6d06f17d-e142-4f45-b9c1-893c38fc2b01" class="plugin plugin-dummy">
Layout, placeholder, plugin and plugin widget have properties for getting their HTML specific classes and IDs.
Layout (instance)
layout.html_class
Placeholder (instance)
placeholder.html_id
placeholder.html_class
Plugin (instance)
plugin.html_id
plugin.html_class
Plugin widget (static call)
plugin_widget.html_class # Static one
Creating a new plugin
Dash comes with several bundled plugins. Do check their source code as example.
Making of a plugin or a plugin widget is quite simple, although there are some rules/guidelines you should follow.
Let’s assume that plugin is named sample_memo. The plugin directory should
then have the following structure.
Note, that you are advised to prefix all your plugin specific media files
with dash_plugin_ for the sake of common sense.
path/to/plugin/sample_memo/
├── static
│   ├── css
│   │   └── dash_plugin_sample_memo.css # Plugin specific CSS
│   ├── images
│   └── js
│       └── dash_plugin_sample_memo.js # Plugin specific JavaScripts
├── templates
│   └── sample_memo
│       ├── render_main.html # Plugin widget template for ``main`` Placeholder
│       └── render_short.html # Plugin widget template for ``shortcuts`` Placeholder
├── __init__.py
├── dash_plugins.py # Where plugins and widgets are defined and registered
├── dash_widgets.py # Where the plugin widgets are defined
└── forms.py # Plugin configuration form
In some cases, you would need plugin specific overridable settings (see
dash.contrib.plugins.weather plugin as an example. You are advised to
write your settings in such a way, that variables of your Django projects’
settings.py module would have DASH_PLUGIN_ prefix.
path/to/plugin/sample_memo/dash_plugins.py
Step by step review of a how to create and register a plugin and plugin
widgets. Note, that Dash auto-discovers your plugins if you place them into a
file named dash_plugins.py of any Django app listed in INSTALLED_APPS
of your Django projects’ settings module.
Define and register the plugin
As already stated, a single plugin widget is registered for a triple (layout, placeholder, plugin). That means, that if you need two widgets, one sized 1x1 and another sized 2x2, you need two plugins for it. You can either manually define all plugins and widgets for the sizes desired, or define a single base plugin or a widget class and have it factory registered for a number of given sizes. Below, both approaches would be explained.
Required imports.
from dash.base import BaseDashboardPlugin, plugin_registry
from path.to.plugin.sample_memo.forms import SampleMemoForm
Defining the Sample Memo plugin (2x2) (to be used in the main placeholder).
class SampleMemo2x2Plugin(BaseDashboardPlugin):

    uid = 'sample_memo_2x2'  # Plugin UID
    name = _("Memo")  # Plugin name
    group = _("Memo")  # Group to which the plugin belongs to
    form = SampleMemoForm  # Plugin forms are explained later
    html_classes = ['sample-memo']  # Optional. Adds extra HTML classes.
Registering the Sample Memo plugin.
plugin_registry.register(SampleMemo2x2Plugin)
Defining the Sample Memo plugin (1x1) (to be used in the shortcuts
placeholder).
class SampleMemo1x1Plugin(SampleMemo2x2Plugin):

    uid = 'sample_memo_1x1'  # Plugin UID
Registering the Sample Memo plugin.
plugin_registry.register(SampleMemo1x1Plugin)
Repeat the steps below for each plugin size (or read about factory registering the plugins and widgets below).
Factory register plugins
Alternatively, you can define just a single plugin base class and have it factory registered for the given sizes. The code below would produce and register classes for in sizes 1x1 and 2x2. When you need to register a plugin for 10 sizes, this approach clearly wins. Besides, it’s very easy to get a clear overview of all plugins sizes registered.
Required imports.
from dash.base import BaseDashboardPlugin
from dash.factory import plugin_factory
from path.to.plugin.sample_memo.forms import SampleMemoForm
Defining the base plugin class.
class BaseSampleMemoPlugin(BaseDashboardPlugin):

    name = _("Memo")  # Plugin name
    group = _("Memo")  # Group to which the plugin belongs to
    form = SampleMemoForm  # Plugin forms are explained later
    html_classes = ['sample-memo']  # Optional. Adds extra HTML classes.
Note, that we don’t provide uid property in the base class.
Now, that we have the base plugin defined, factory register it for the sizes given.
sizes = (
    (1, 1),
    (2, 2),
)
plugin_factory(BaseSampleMemoPlugin, 'sample_memo', sizes)
In the example above, “sample_memo” is the base name of the plugin. Size information would be appended to it (“sample_memo_1x1”, “sample_memo_2x2”).
Register plugin widgets
Plugin widgets are defined in dash_widgets.py module (described later), but
registered in the dash_plugins.py, which is auto-discovered by Dash.
Required imports.
from dash.base import plugin_widget_registry
from path.to.plugin.sample_memo.dash_widgets import (
    SampleMemo1x1ExampleMainWidget,
    SampleMemo2x2ExampleMainWidget,
)
Registering the Sample Memo plugin widget for placeholder main of layout
example`.
plugin_widget_registry.register(SampleMemo2x2ExampleMainWidget)
Registering the Sample Memo plugin widget for placeholder shortcuts of
layout example.
plugin_widget_registry.register(SampleMemo1x1ExampleMainWidget)
path/to/plugin/sample_memo/dash_widgets.py
Why to have another file for defining widgets? Just to keep the code clean and
less messy, although you could perfectly define all your plugin widgets in the
module dash_plugins.py, it’s recommended to keep it separate.
Take into consideration, that dash_widgets.py is not an auto-discovered
file pattern. All your plugin widgets should be registered in modules named
dash_plugins.py.
Define and register the plugin widget
Required imports.
from django.template.loader import render_to_string
from dash.base import BaseDashboardPluginWidget
Memo plugin widget for Example layout (placeholder main).
class SampleMemo2x2ExampleMainWidget(BaseDashboardPluginWidget):

    layout_uid = 'example'  # Layout for which the widget is written
    placeholder_uid = 'main'  # Placeholder within the layout for which
                              # the widget is written
    plugin_uid = 'sample_memo_2x2'  # Plugin for which the widget is
                                    # written
    cols = 2  # Number of widget columns
    rows = 2  # Number of widget rows

    def render(self, request=None):
        context = {'plugin': self.plugin}
        return render_to_string('sample_memo/render_main.html', context)
Memo plugin widget for Example layout (placeholder shortcuts).
class SampleMemo1x1ExampleShortcutWidget(SampleMemo2x2ExampleMainWidget):

    placeholder_uid = 'shortcuts'  # Placeholder within the layout for
                                   # which the widget is written
    cols = 1  # Number of widget columns
    rows = 1  # Number of widget rows

    def render(self, request=None):
        context = {'plugin': self.plugin}
        return render_to_string(
            'sample_memo/render_shortcuts.html', context
        )
Factory register plugin widgets
Alternatively, you can define just a single plugin widget base class and have it factory registered for the given sizes. The code below would produce and register classes for in sizes 1x1 and 2x2.
Required imports.
from django.template.loader import render_to_string
from dash.factory import plugin_widget_factory
from dash.base import BaseDashboardPluginWidget
Defining the base plugin widget class.
class BaseSampleMemoWidget(BaseDashboardPluginWidget):

    def render(self, request=None):
        context = {'plugin': self.plugin}
        return render_to_string('sample_memo/render.html', context)
Now, that we have the base plugin defined, factory register it for the sizes given.
sizes = (
    (1, 1),
    (2, 2),
)
plugin_widget_factory(
    BaseSampleMemoWidget, 'example', 'main', 'sample_memo', sizes
)
In the example above:
- “sample_memo” is the base name of the plugin and it should match the name given to plugin factory exactly.
- “example” is the uid of the layout, for which the widget is being registered.
- “main” is the uid of the placeholder, for which the widget it being registered.
path/to/plugin/sample_memo/forms.py
What are the plugin forms? Very simple - if plugin is configurable, it has a form. If you need to have a custom CSS or a JavaScript included when rendering a specific form, use Django’s class Media directive in the form.
Required imports.
from django import forms
from dash.base import DashboardPluginFormBase
Memo form (for Sample Memo plugin).
class SampleMemoForm(forms.Form, DashboardPluginFormBase):

    plugin_data_fields = [
        ("title", ""),
        ("text", "")
    ]

    title = forms.CharField(label=_("Title"), required=False)
    text = forms.CharField(label=_("Text"), required=True,
                           widget=forms.widgets.Textarea)

    def __init__(self, *args, **kwargs):
        super(MemoForm, self).__init__(*args, **kwargs)
Now, that everything is ready, make sure your that both layout and the plugin
modules are added to INSTALLED_APPS for your projects’ Django settings.py
module.
INSTALLED_APPS = (
    # ...
    'path.to.layout.example',
    'path.to.plugin.sample_memo',
    # ...
)
After it’s done, go to terminal and type the following command.
./manage.py dash_sync_plugins
If your HTTP server is running, you would then be able to access your dashboard.
- View URL: http://127.0.0.1:8000/dashboard/
- Edit URL: http://127.0.0.1:8000/dashboard/edit/
Note, that you have to be logged in, in order to use the dashboard. If your new
plugin doesn’t appear, set the DASH_DEBUG to True in your Django’s local
settings module (local_settings.py), re-run your code and check console for
error notifications.
Plugin and widget factory
In general, when making a new plugin, base widgets are made for then too. By creating base widgets you avoid duplication of the code. See the example below.
from dash.base import BaseDashboardPlugin

class BaseMemoPlugin(BaseDashboardPlugin):

    name = _("Memo")
    group = _("Memo")
    form = MemoForm
Now that we have the base plugin, we can use plugin factory to generate and register plugin classes of the required dimensions.
from dash.factory import plugin_factory
plugin_factory(BaseMemoPlugin, 'memo', ((5, 6), (6, 5), (6, 6)))
The code above will generate “memo_5x6”, “memo_6x5” and “memo_6x6” plugin
classes which subclass the BaseMemoPlugin and register them in the plugin
registry. The uid property would be automatically generated.
Same goes for the widgets.
from dash.base import BaseDashboardPluginWidget

class BaseMemoWidget(BaseDashboardPluginWidget):

    def render(self, request=None):
        context = {'plugin': self.plugin}
        return render_to_string('memo/render.html', context)
Now that we have the base widget, we can use plugin widget factory to generate and register plugin widget classes of the required dimensions.
from dash.factory import plugin_widget_factory

plugin_widget_factory(
    BaseMemoWidget,
    'bootstrap2_fluid',
    'main',
    'memo',
    ((5, 6), (6, 5), (6, 6))
)
The code above will generate “memo_5x6”, “memo_6x5” and “memo_6x6” plugin
widget classes which subclass the BaseMemoWidget and register them in the
plugin widget registry. The layout_uid, placeholder_uid,
plugin_uid, cols and rows properties would be automatically
generated.
Of course, there would be cases when you can’t use factory, for example because each of your plugins or widgets differs from others by tiny important bits, but if you notice yourself subclassing the base widget or plugin many times without any change to the code, then it’s perhaps a right time to start using the factory.
Layout, plugin and widget summary
When making your own layouts, plugins and plugin widgets you are free to use the API as you wish. While developing the Dash, I found the follow practices useful:
- When making a new plugin, always make a base plugin class, from which all size specific ones would derive.
- Do create base plugin widgets (with HTML templates) in the plugin, but do not
register them there. Use factory (
dash.factory) to generate and register layout specific plugin widgets - preferably in the layout module. - If you’re adding custom plugin to existing bundled layout (those that
reside in
dash.contrib.layouts), create a new module nameddash_custom(or any other name that you prefer) and factory generate/register your layout specific plugin widgets in a module nameddash_plugins.py(do not forget to add the module toINSTALLED_APPS, so that it auto-discovered).
Permissions
Plugin system allows administrators to specify the access rights to every plugin. Dash permissions are based on Django Users and User Groups. Access rights are manageable via Django admin (/administration/dash/dashboardplugin/). Note, that your admin URL prefix may vary from the one given in example (it’s usually “/admin/”, while in example it’s “/administration/”). If user doesn’t have the rights to access plugin, it doesn’t appear on his dashboard even if has been added to it (imagine, you have once granted the right to use the news plugin to all users, but later on decided to limit it to Staff members group only). Note, that superusers have access to all plugins.
        Plugin access rights management interface in Django admin
┌──────────────────────────────┬────────────────────┬─────────────────────┐
│ `Plugin`                     │ `Users`            │ `Groups`            │
├──────────────────────────────┼────────────────────┼─────────────────────┤
│ Video (big_video)            │ John Doe           │ Dashboard users     │
├──────────────────────────────┼────────────────────┼─────────────────────┤
│ TinyMCE memo (tinymce_memo)  │                    │ Dashboard users     │
├──────────────────────────────┼────────────────────┼─────────────────────┤
│ News (news)                  │ Oscar, John Doe    │ Staff members       │
├──────────────────────────────┼────────────────────┼─────────────────────┤
│ URL (url)                    │                    │ Dashboard users     │
├──────────────────────────────┼────────────────────┼─────────────────────┤
│ Video (video)                │                    │ Dashboard users     │
├──────────────────────────────┼────────────────────┼─────────────────────┤
│ Dummy (dummy)                │                    │ Testers             │
├──────────────────────────────┼────────────────────┼─────────────────────┤
│ Dummy (large_dummy)          │                    │ Testers             │
├──────────────────────────────┼────────────────────┼─────────────────────┤
│ Memo (big_memo)              │                    │ Dashboard users     │
└──────────────────────────────┴────────────────────┴─────────────────────┘
Management commands
There are several management commands.
dash_find_broken_dashboard_entries. Find broken dashboard entries that occur when some plugin which did exist in the system, no longer exists.dash_sync_plugins. Should be ran each time a new plugin is being added to the Dash.dash_update_plugin_data. A mechanism to update existing plugin data in case if it had become invalid after a change in a plugin. In order for it to work, each plugin should implement andupdatemethod, in which the data update happens.
Tuning
There are number of Dash settings you can override in the settings.py module of your Django project:
DASH_RESTRICT_PLUGIN_ACCESS(bool): If set to True, (Django) permission system for dash plugins is enabled. Defaults to True. Setting this to False makes all plugins available for all users.DASH_ACTIVE_LAYOUT(str): Active (default) layout UID. Defaults to “android”.DASH_LAYOUT_CELL_UNITS(str): Allowed values for layout cell units. Defaults to (“em”, “px”, “pt”, “%”).DASH_DISPLAY_AUTH_LINK(bool): If set to True, the log out link is shown in the Dash drop-down menu. Defaults to True.
For tuning of specific contrib plugin, see the docs in the plugin directory.
Styling tips
Font Awesome is used for icons. As a convention, all icons of font-awesome are placed within a span. Next to their original class, they all should be getting an extra class “iconic”. Follow that rule when making a new layout or a plugin (HTML). It allows to make the styling easy, since icon colours could be then changed within no time.
Bundled plugins and layouts
Dash ships with number of bundled (demo) plugins and layouts that are mainly made to demonstrate its’ abilities. In order to work among various layouts (themes), each plugin has a single widget registered for a single layout. It’s possible to unregister a bundled widget and replace it with a custom one.
Bundled plugins
Below a short overview of the plugins. See the README.rst file in directory of each plugin for details.
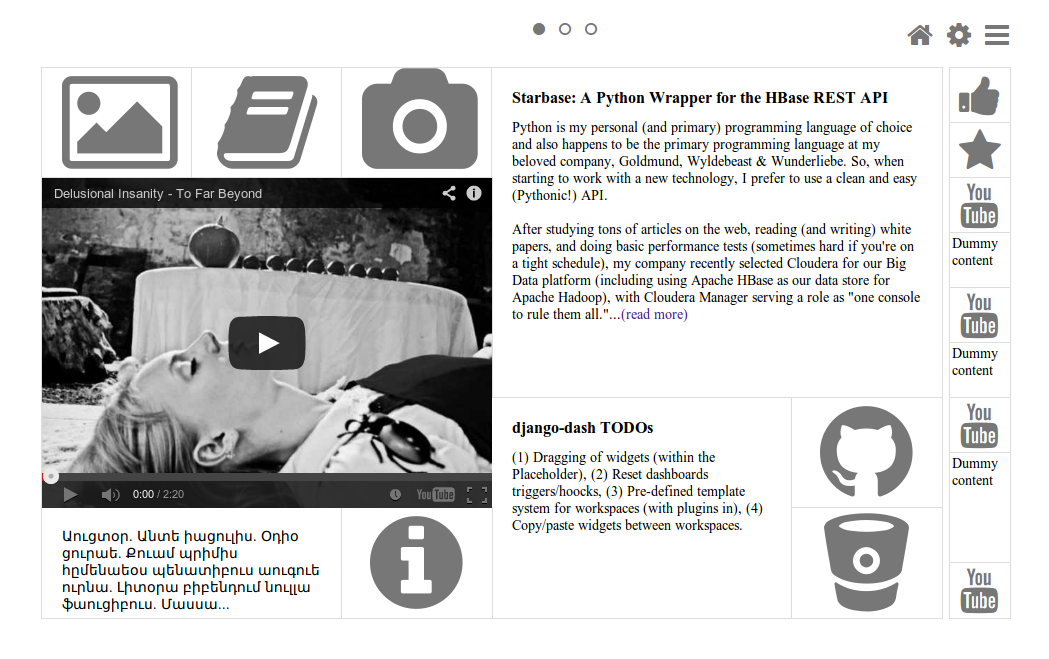
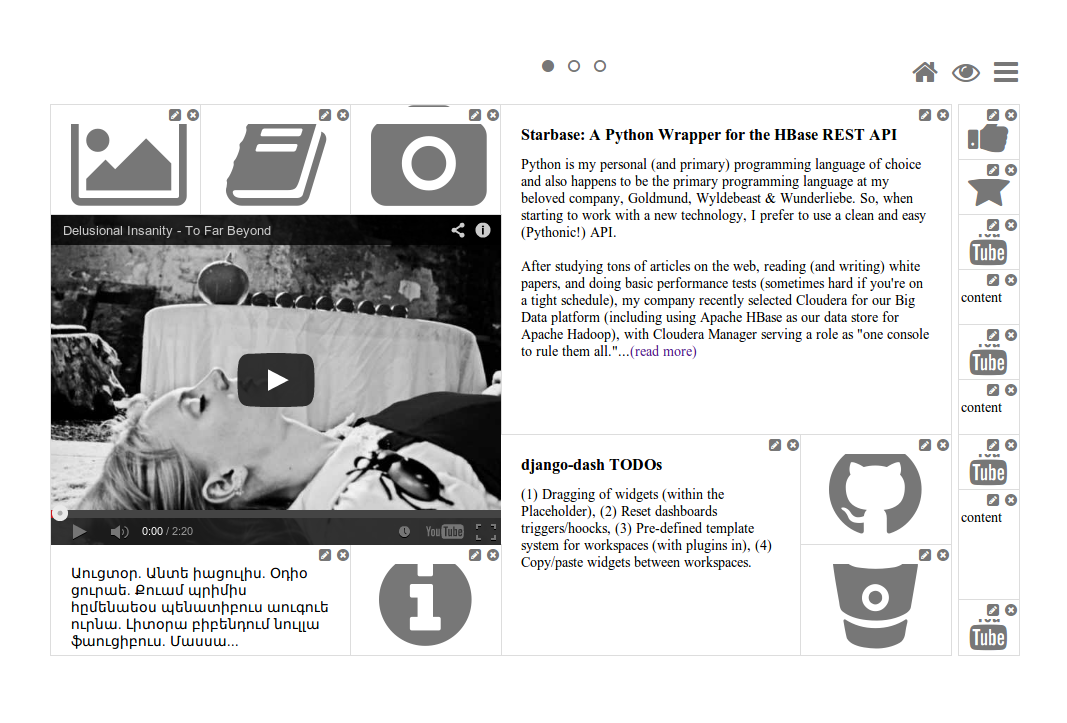
- Dummy plugin. Mainly made for quick testing. Still, is perfect example of how to write a plugin and widgets.
- Image plugin. Allows users to put images on their dashboard. If you plan to make a plugin that deals with file uploads, make sure to check the source of this one first.
- Memo plugin. Allows users to put short notes on their dashboard.
- RSS feed plugin. Allows users to put any RSS feed right into the dashboard.
- URL plugin. Allows users to put links to their dashboard.
- Bookmark plugin. Allows users to put bookmarks to their dashboard. Bookmarks are added by the administrator.
- Video plugin. Allows users to put YouTube or Vimeo videos to their dashboard.
- Weather plugin. Allows to put a weather widget into dashboard.
Demo plugins
- Sample D3 plugins. Shows how to transform D3.js charts into Dash plugins.
- Sample Polychart2 plugin. Shows how to transform Polychart2.js charts into Dash plugins.
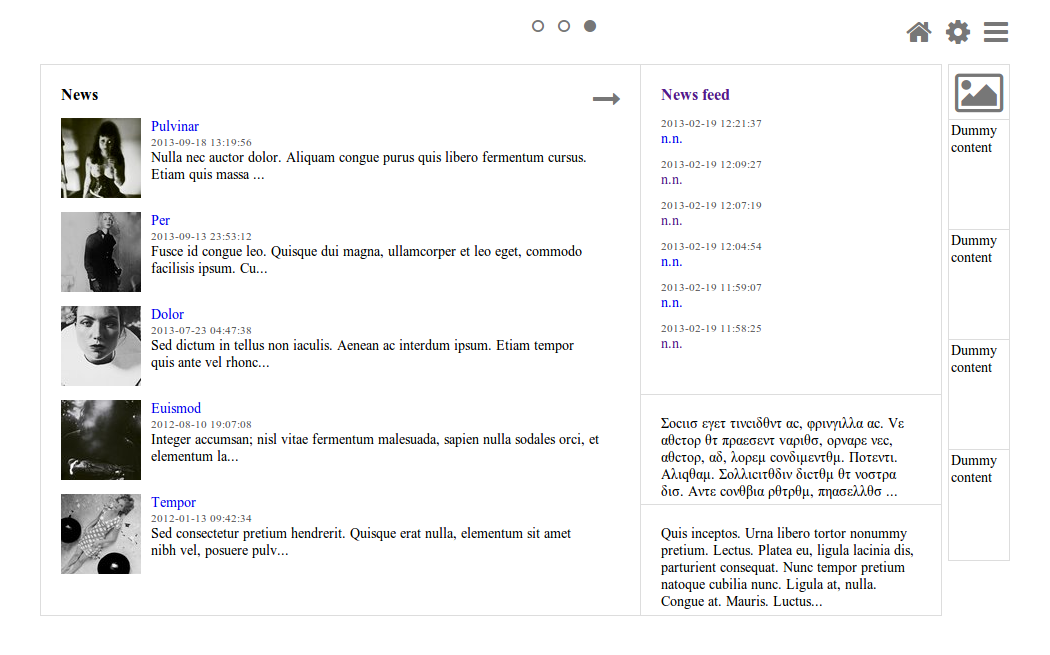
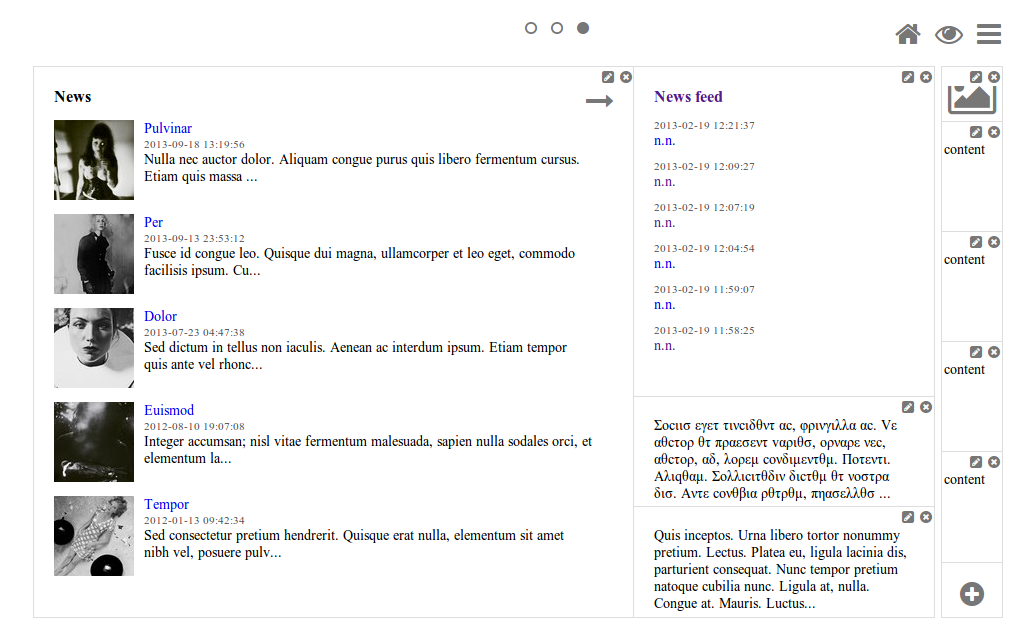
- News plugin. Shows how to embed your Django news application (front-end part of it) into a Dash plugin widget.
Bundled layouts
Below a short overview of the layouts. See the README.rst file in directory of each layout for details.
- Android (like) layout. Has two placeholders: main (6 cols x 5 rows, each block sized 150x110 px) and shortcuts (1 col x 10 rows, each block sized 60x55 px).
- Bootstrap 2 fluid (like) layout. Has one placeholder: main (11 cols x 9 rows, each block sized 70x40 px).
- Windows 8 (like) layout. Has two placeholders: main (6 cols x 4 rows, each block sized 140x135 px) and sidebar (2 cols x 4 rows, each block sized 140x135 px).
Demo layouts
- Example layout. Has five placeholders: top (8 cols x 1 rows, each block sized 55x55 px), right (3 col x 8 rows, each block sized 55x55 px), bottom ( 8 cols x 1 rows, each block sized 55x55 px), left (3 col x 8 rows, each block sized 55x55 px) and main (5 col x 4 rows, each block sized 110x95 px).
Naming conventions
Although you are free to name your plugins and widgets as you want (except that you should comply with PEP-008), there are some naming conventions introduced, that you are recommended to follow.
- Example1x1Plugin: 1x1 example plugin
- Example1x1AndroidMainWidget: 1x1 widget for 1x1 example plugin (layout Android, placeholder ‘main’)
- Example1x1AndroidShortcutsWidget: 1x1 widget for 1x1 example plugin ( layout Android, placeholder ‘shortcuts’)
- Example1x1Windows8MainWidget: 1x1 widget for 1x1 example plugin (layout Windows 8, placeholder ‘main’)
- Example1x1Windows8SidebarWidget: 1x1 widget for 1x1 example plugin ( layout Windows 8, placeholder ‘sidebar’)
- Example2x3Plugin: 2x3 example plugin
- Example2x3Windows8MainWidget: 2x3 widget for 2x3 example plugin (layout Windows 8, placeholder ‘main’)
- Example2x3Windows8SidebarWidget: 2x3 widget for 2x3 example plugin ( layout Windows 8, placeholder ‘sidebar’)
- Example6x1Plugin: 6x1 example plugin
- Example6x1YourLayoutSidebarWidget: 6x1 widget for 6x1 example plugin ( layout Your Layout, placeholder ‘main’)
Debugging
Most of the errors are logged (DEBUG). If you have written a plugin and it somehow doesn’t appear in the list of available plugins, do run the following management command:
./manage.py dash_sync_plugins
The dash_sync_plugins not only syncs your plugins into the database, but
also is a great way of checking for possible errors.
Available translations
- Dutch (core and plugins)
- Russian (core and plugins)
Troubleshooting
- If you somehow get problems installing
Dash, check the example project and the requirements.txt.
Testing
Project is covered by test (functional- and browser-tests).
Py.test is used as a default test runner.
To test with all supported Python/Django versions type:
tox
To test against specific environment, type:
tox -e py35-django18
To test just your working environment type:
./runtests.py
To tests just your working environment (with Django test runner) type:
./manage.py test dash
It’s assumed that you have all the requirements installed. If not, first install the test requirements:
pip install -r examples/requirements/test.txt
Browser tests
For browser tests you may choose between (headless) Firefox or (headless) Chrome. Going headless is faster, but normal browser tests tell you more (as you see what exactly happens on the screen). Both cases require some effort and both have disadvantages regarding the installation (although once you have them installed they work perfect).
Set up Firefox
Download the latest version of geckodriver (“geckodriver-vX.XX.X-linux64.tar.gz”) from this location and unpack it somewhere (
`tar -xvzf geckodriver-vX.XX.X-linux64.tar.gz`). Then give executable permissions to geckodriver (`chmod +x geckodriver`) move the geckodriver binary to/usr/local/binor any location on your system PATH.Specify the full path to your Firefox in
FIREFOX_BIN_PATHsetting. Example:FIREFOX_BIN_PATH = '/usr/lib/firefox/firefox'
If you set
FIREFOX_BIN_PATHto None, system Firefox would be used.
After that your Selenium tests would work.
Set up headless Firefox
Install
xvfbpackage which is used to start Firefox in headless mode.sudo apt-get install xvfb
Run the tests using headless Firefox.
./scripts/runtests.sh
Or run tox tests using headless Firefox.
./scripts/tox.sh
Setup Chrome
Download the latest version of chromedriver (“chromedriver_linux64.zip”) from this location and unpack it somewhere. Then give executable permissions to chromedriver (
`chmod +x chromedriver`) move the chromedriver binary to/usr/local/binor any location on your system PATH.Specify the full path to your Firefox in
CHROME_DRIVER_EXECUTABLE_PATHsetting. Example:CHROME_DRIVER_EXECUTABLE_PATH = '/usr/bin/chromedriver'
Set up headless Chrome
from selenium import webdriver
CHROME_DRIVER_OPTIONS = webdriver.ChromeOptions()
CHROME_DRIVER_OPTIONS.add_argument('-headless')
CHROME_DRIVER_OPTIONS.add_argument('-no-sandbox')
CHROME_DRIVER_OPTIONS.set_capability('chrome.binary', "/usr/bin/google-chrome")

CHROME_DRIVER_EXECUTABLE_PATH = '/usr/bin/chromedriver'
After that your Selenium tests would work.
License
GPL-2.0-only OR LGPL-2.1-or-later
Author
Artur Barseghyan <artur.barseghyan@gmail.com>
Screenshots
Android layout
Several screenshots of Android layout are presented below.
Dashboard workspace (view mode) on which you can see the following plugins used:
- URL plugin
- TinyMCE Memo plugin
- Memo plugin
- Video plugin
Dashboard workspace (edit mode), which is a edit mode of the above mentioned dashboard workspace.
Dashboard workspace (view mode) on which you can see the following plugins used:
- News plugin
- RSS feed plugin
- Dummy plugin
- URL plugin
Dashboard workspace (edit mode), which is a edit mode of the above mentioned dashboard workspace.
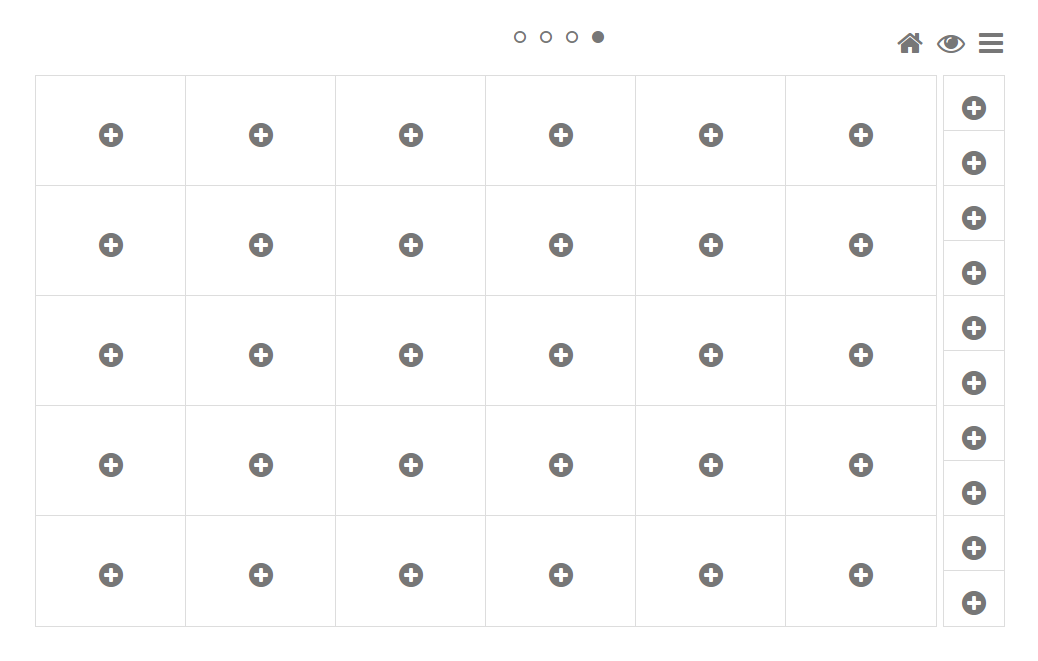
Dashboard workspace (edit mode) is an empty dashboard workspace in edit mode.
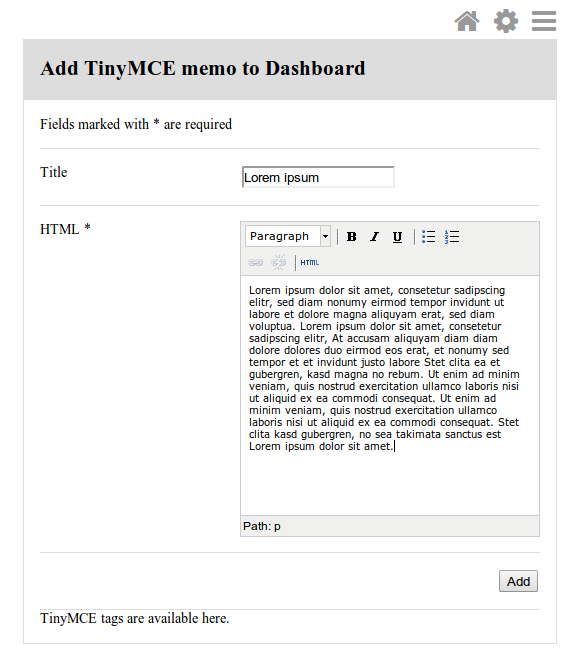
Choose widget to added to the dashboard workspace.

TinyMCE plugin widget form
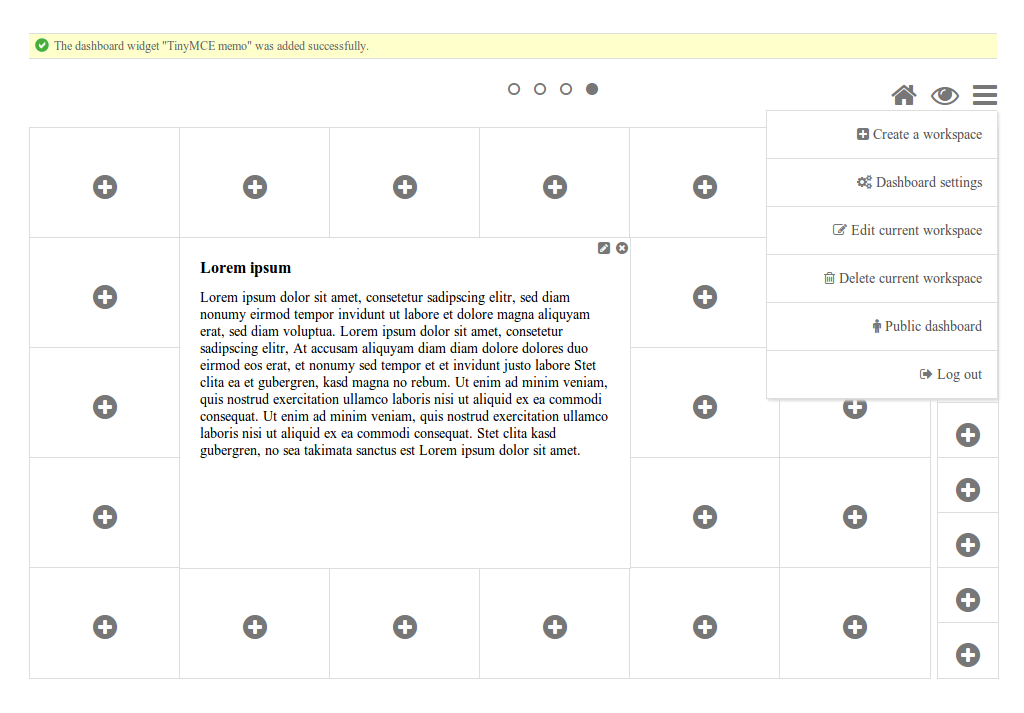
Dashboard workspace (edit mode) on which the TinyMCE plugin widget has been just added. Menu is unfolded.
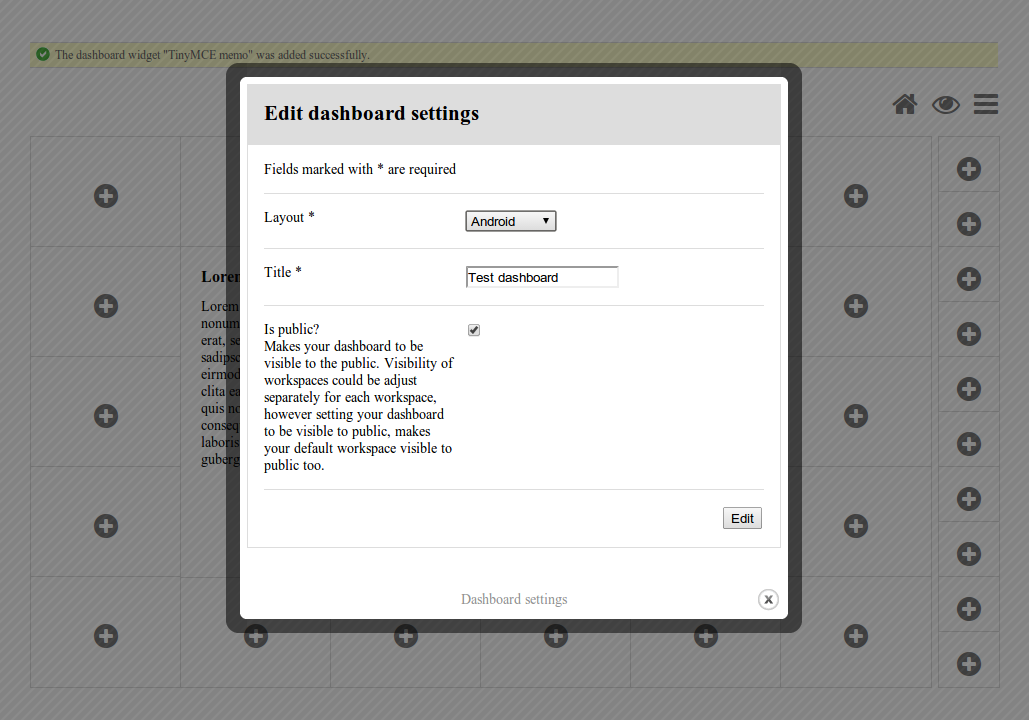
A form to edit global dashboard settings.
A form to edit settings of current dashboard workspace.
Bootstrap 2 Fluid layout
Several screenshots of Bootstrap 2 Fluid layout are presented below.
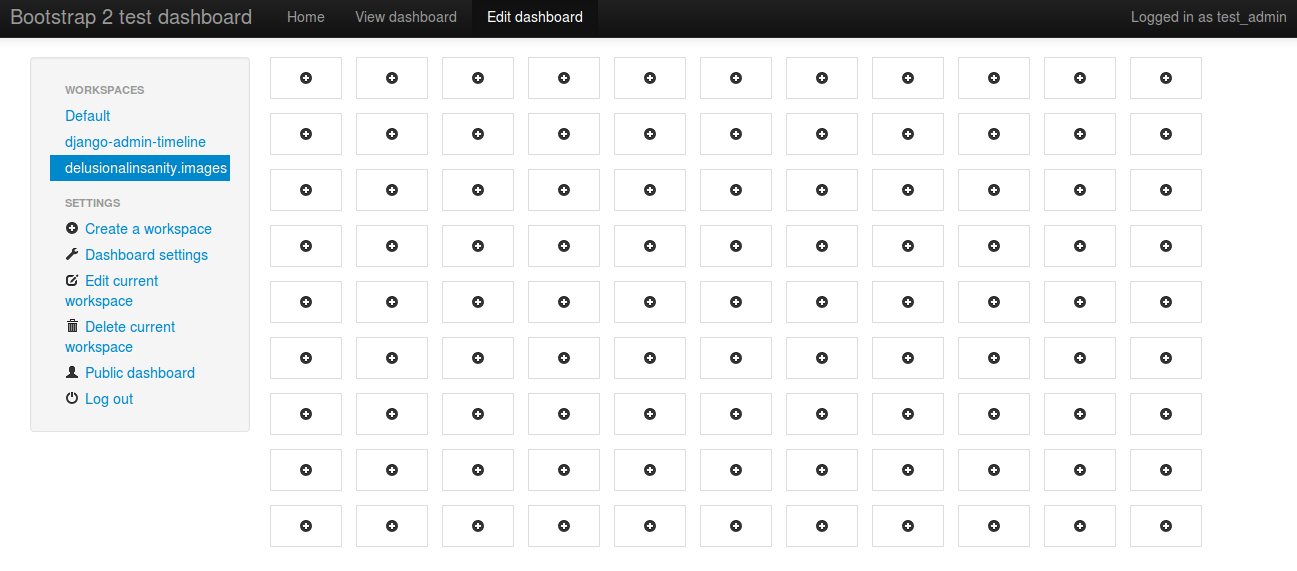
Dashboard workspace (edit mode) is an empty dashboard workspace in edit mode.
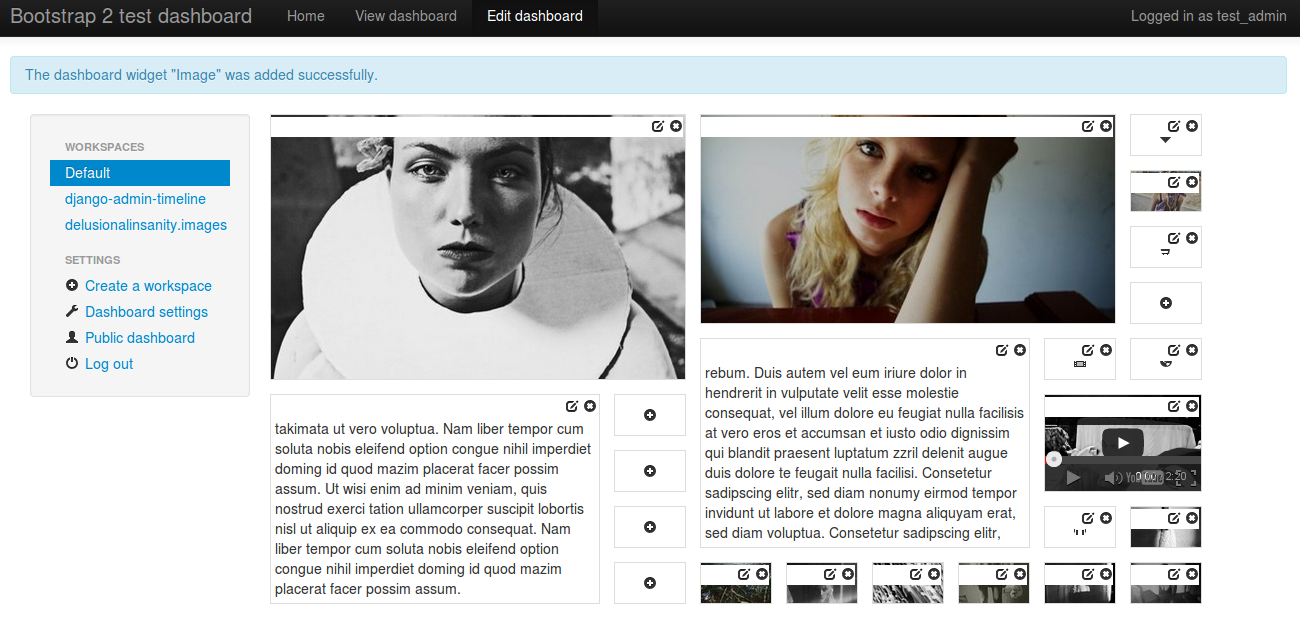
Dashboard workspace (edit mode) - a dashboard workspace filled.
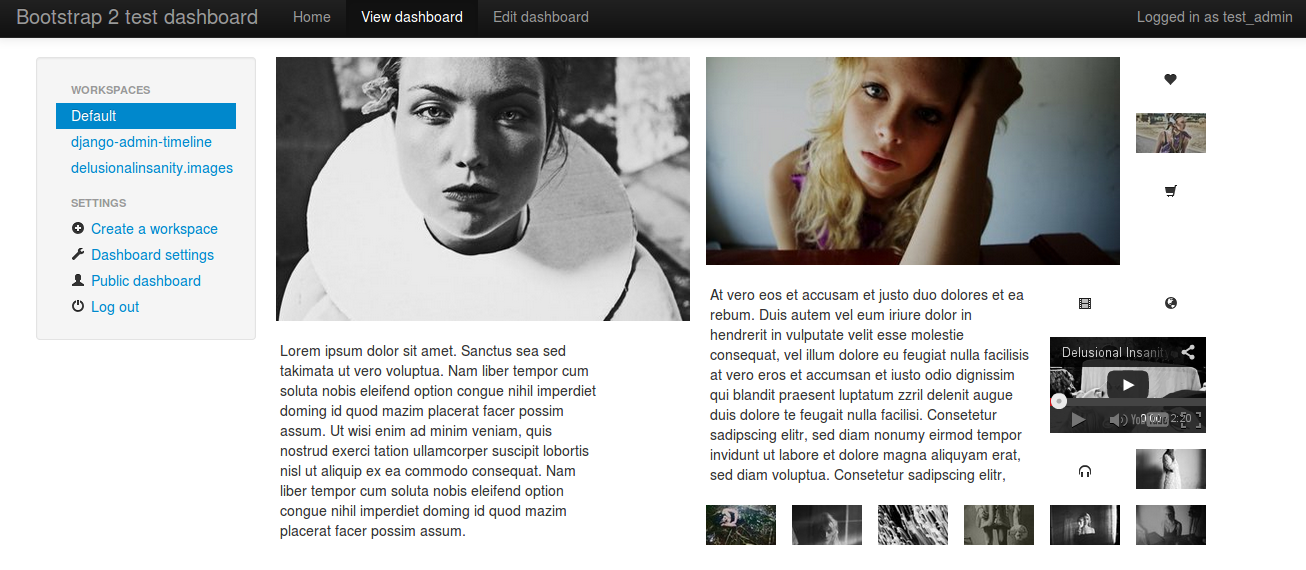
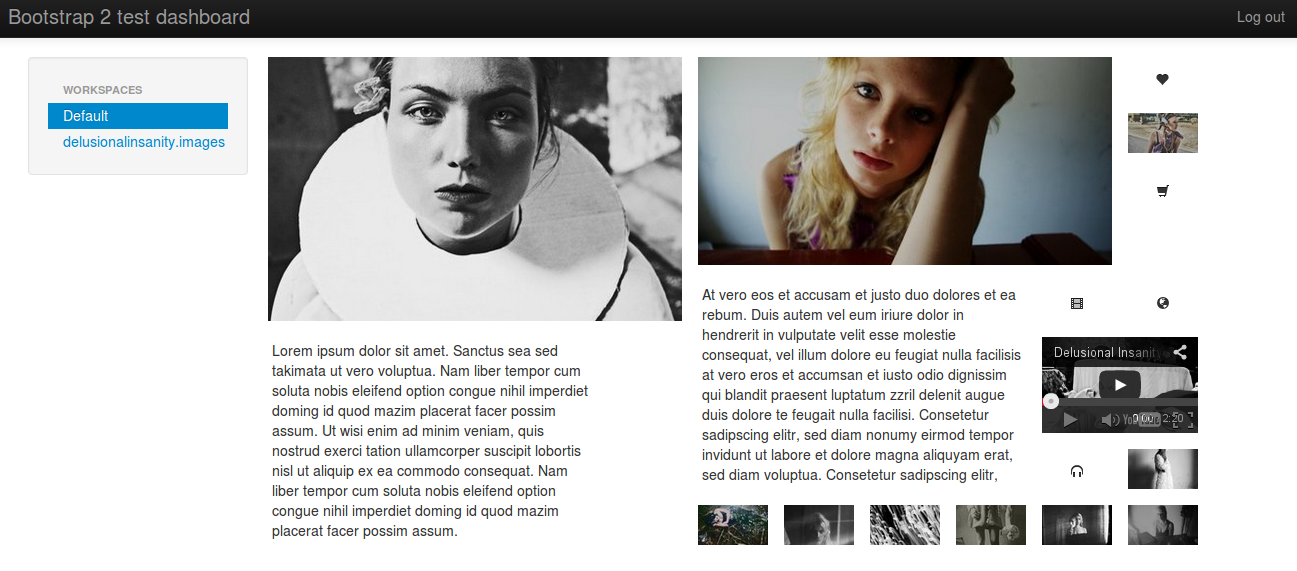
Dashboard workspace (view mode) of the above mentioned dashboard workspace.
Public dashboard of above mentioned dashboard workspace.
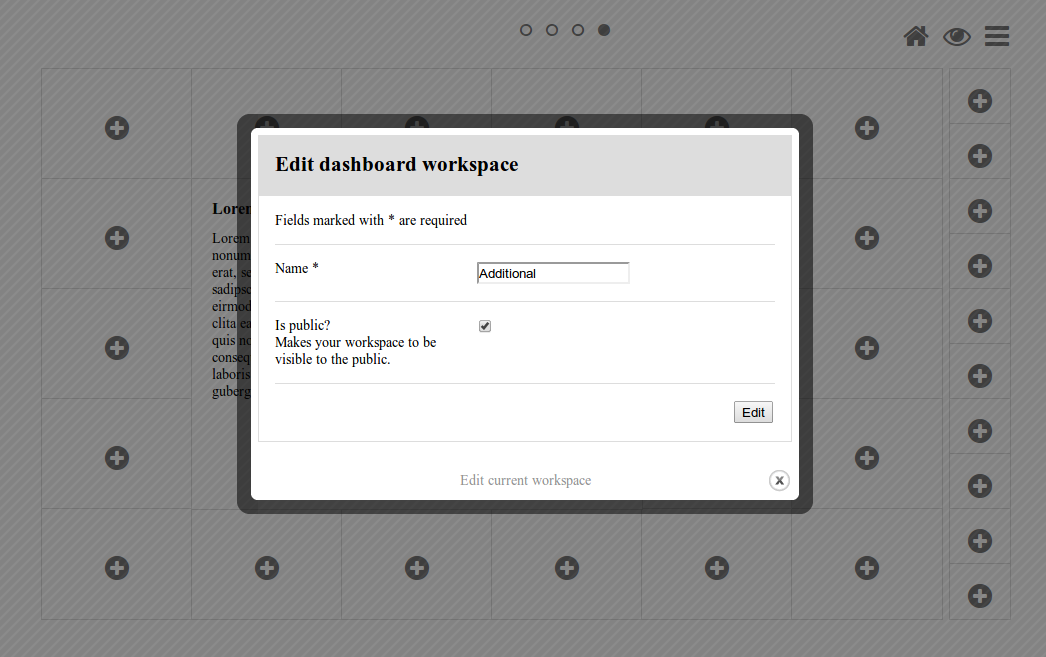
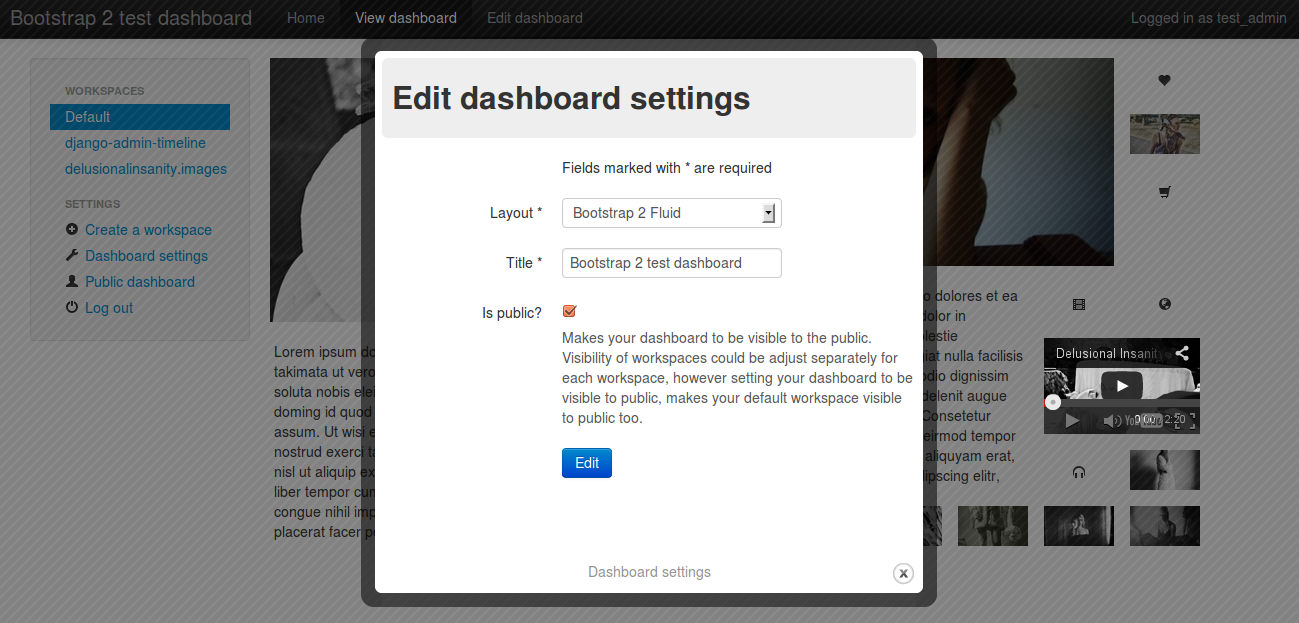
Edit dashboard settings dialogue.
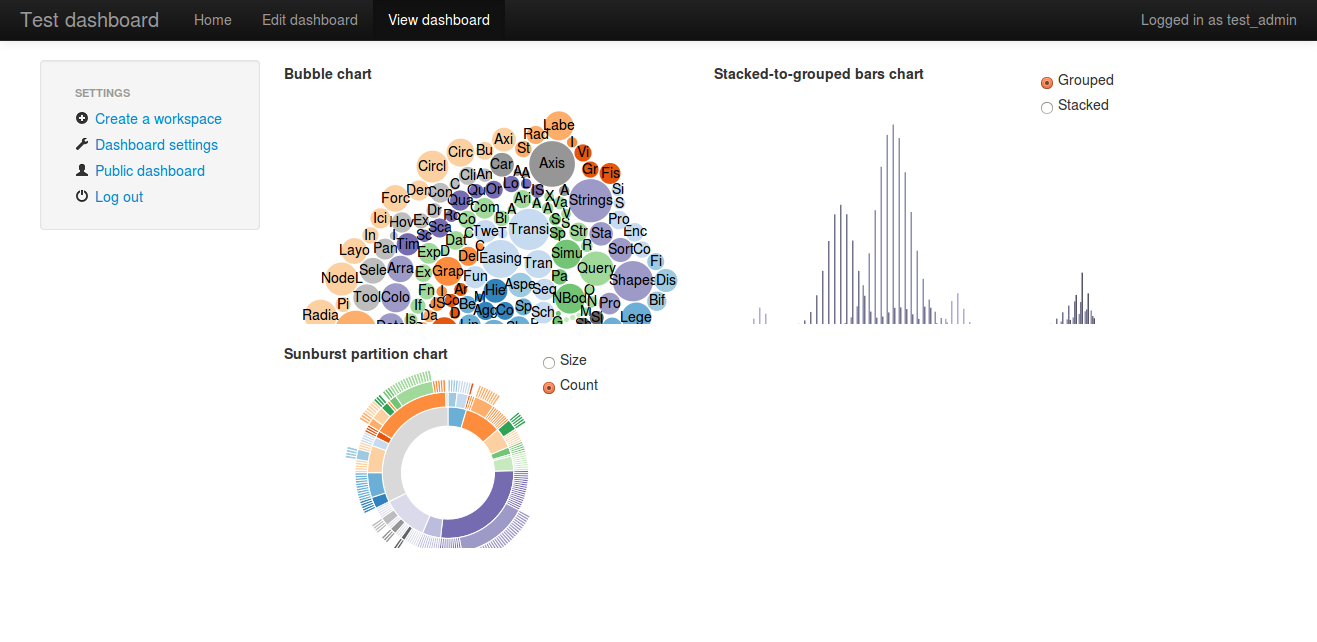
Bubble Chart, Stacked-to-Grouped Bars and Sunburst Partition (view dashboard mode).
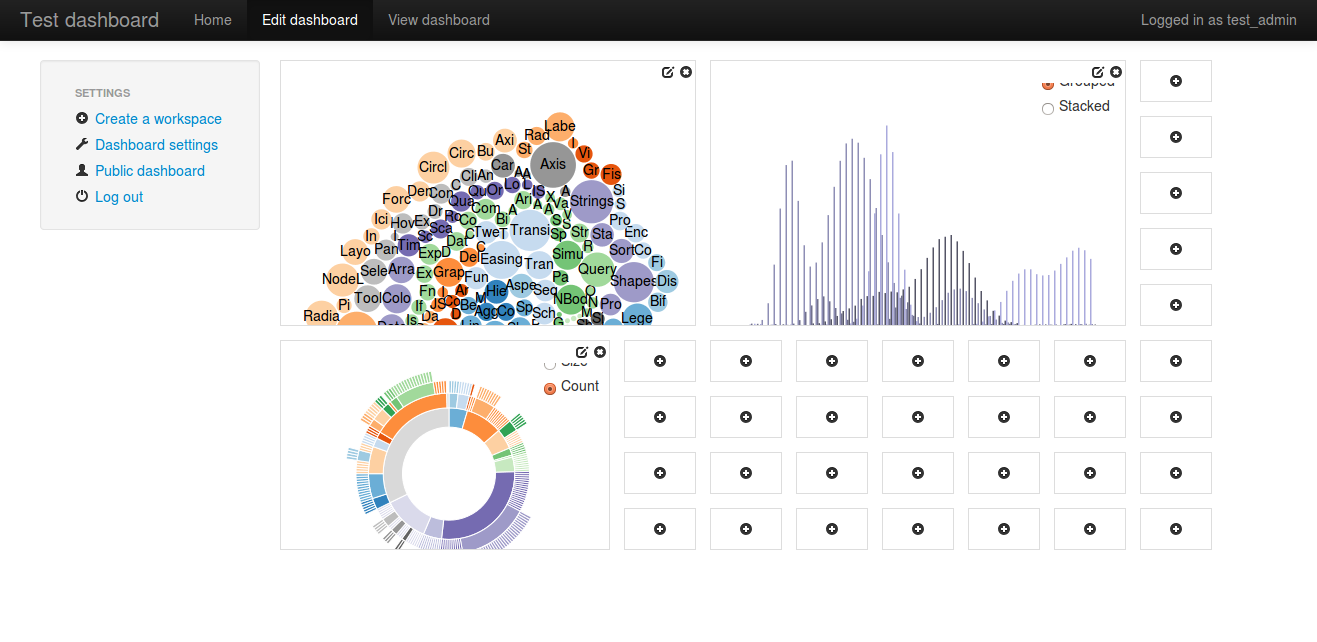
Bubble Chart, Stacked-to-Grouped Bars and Sunburst Partition (edit dashboard mode).
Example layout
Several screenshots of Example layout are presented below.
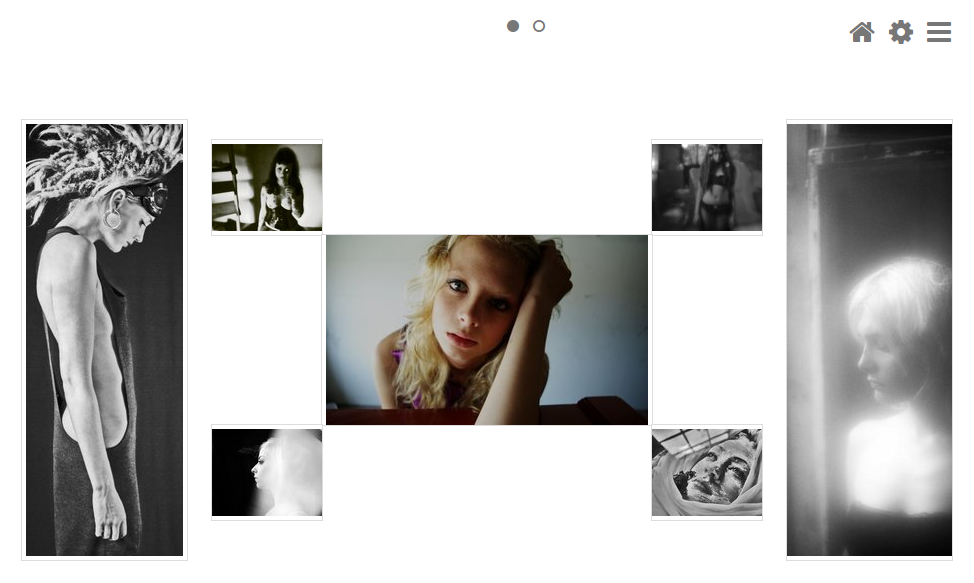
Dashboard workspace (edit mode) is an empty dashboard workspace in edit mode.

Dashboard workspace (edit mode) - above mentioned dashboard workspace was filled with images.
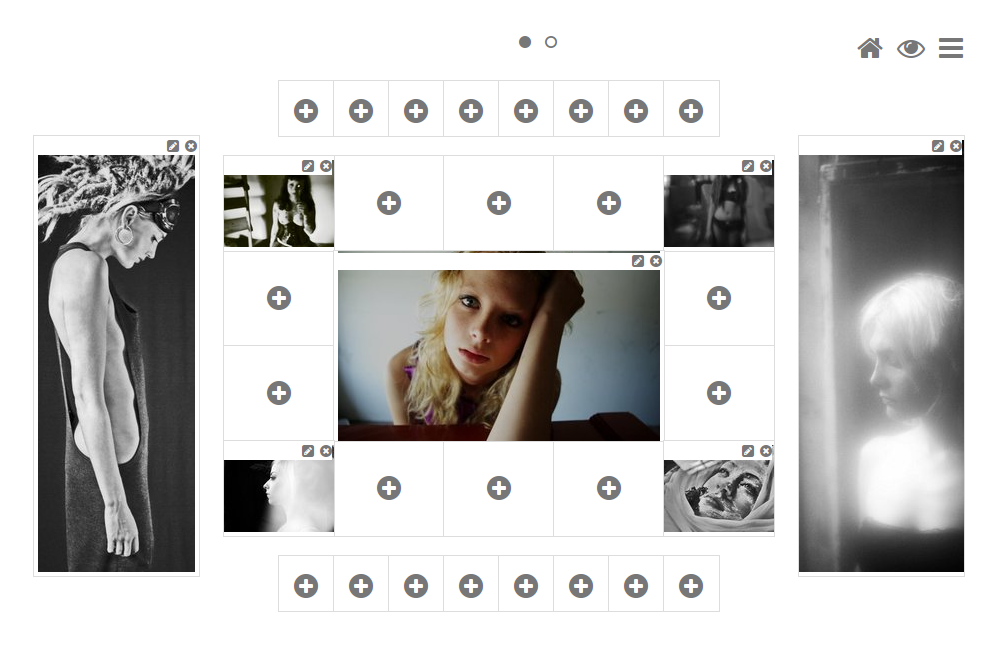
Dashboard workspace (view mode) of the above mentioned dashboard workspace
Documentation!
Contents:
- django-dash
- Prerequisites
- Key concepts
- Main features
- FAQ
- Some screenshots
- Demo
- Installation
- Creating a new layout
- Creating a new plugin
- Plugin and widget factory
- Layout, plugin and widget summary
- Permissions
- Management commands
- Tuning
- Styling tips
- Bundled plugins and layouts
- Naming conventions
- Debugging
- Available translations
- Troubleshooting
- Testing
- License
- Support
- Author
- Screenshots
- Documentation!
- Quick start
- Release history and notes
- dash package
- Subpackages
- dash.contrib package
- Subpackages
- dash.contrib.apps package
- dash.contrib.layouts package
- Subpackages
- dash.contrib.layouts.android package
- dash.contrib.layouts.bootstrap2 package
- Submodules
- dash.contrib.layouts.bootstrap2.apps module
- dash.contrib.layouts.bootstrap2.conf module
- dash.contrib.layouts.bootstrap2.dash_layouts module
- dash.contrib.layouts.bootstrap2.dash_plugins module
- dash.contrib.layouts.bootstrap2.dash_widgets module
- dash.contrib.layouts.bootstrap2.defaults module
- dash.contrib.layouts.bootstrap2.forms module
- dash.contrib.layouts.bootstrap2.settings module
- Module contents
- dash.contrib.layouts.windows8 package
- Module contents
- Subpackages
- dash.contrib.plugins package
- Subpackages
- dash.contrib.plugins.dummy package
- dash.contrib.plugins.image package
- Submodules
- dash.contrib.plugins.image.apps module
- dash.contrib.plugins.image.conf module
- dash.contrib.plugins.image.dash_plugins module
- dash.contrib.plugins.image.dash_widgets module
- dash.contrib.plugins.image.defaults module
- dash.contrib.plugins.image.forms module
- dash.contrib.plugins.image.helpers module
- dash.contrib.plugins.image.settings module
- Module contents
- dash.contrib.plugins.memo package
- dash.contrib.plugins.rss_feed package
- Subpackages
- Submodules
- dash.contrib.plugins.rss_feed.apps module
- dash.contrib.plugins.rss_feed.dash_plugins module
- dash.contrib.plugins.rss_feed.dash_widgets module
- dash.contrib.plugins.rss_feed.defaults module
- dash.contrib.plugins.rss_feed.forms module
- dash.contrib.plugins.rss_feed.helpers module
- dash.contrib.plugins.rss_feed.urls module
- dash.contrib.plugins.rss_feed.views module
- Module contents
- dash.contrib.plugins.url package
- Submodules
- dash.contrib.plugins.url.admin module
- dash.contrib.plugins.url.apps module
- dash.contrib.plugins.url.conf module
- dash.contrib.plugins.url.dash_plugins module
- dash.contrib.plugins.url.dash_widgets module
- dash.contrib.plugins.url.defaults module
- dash.contrib.plugins.url.forms module
- dash.contrib.plugins.url.models module
- dash.contrib.plugins.url.settings module
- Module contents
- dash.contrib.plugins.video package
- dash.contrib.plugins.weather package
- Submodules
- dash.contrib.plugins.weather.apps module
- dash.contrib.plugins.weather.conf module
- dash.contrib.plugins.weather.dash_plugins module
- dash.contrib.plugins.weather.dash_widgets module
- dash.contrib.plugins.weather.defaults module
- dash.contrib.plugins.weather.forms module
- dash.contrib.plugins.weather.settings module
- Module contents
- Module contents
- Subpackages
- Module contents
- Subpackages
- dash.lib package
- dash.management package
- dash.templatetags package
- dash.contrib package
- Submodules
- dash.admin module
- dash.base module
- dash.clipboard module
- dash.compat module
- dash.conf module
- dash.constants module
- dash.decorators module
- dash.defaults module
- dash.discover module
- dash.exceptions module
- dash.factory module
- dash.fields module
- dash.forms module
- dash.helpers module
- dash.json_package module
- dash.models module
- dash.settings module
- dash.tests module
- dash.urls module
- dash.utils module
- dash.views module
- dash.widgets module
- Module contents
- Subpackages
- Indices and tables
- Quick start
- Release history and notes
- dash package
- Subpackages
- dash.contrib package
- Subpackages
- dash.contrib.apps package
- dash.contrib.layouts package
- Subpackages
- dash.contrib.layouts.android package
- dash.contrib.layouts.bootstrap2 package
- Submodules
- dash.contrib.layouts.bootstrap2.apps module
- dash.contrib.layouts.bootstrap2.conf module
- dash.contrib.layouts.bootstrap2.dash_layouts module
- dash.contrib.layouts.bootstrap2.dash_plugins module
- dash.contrib.layouts.bootstrap2.dash_widgets module
- dash.contrib.layouts.bootstrap2.defaults module
- dash.contrib.layouts.bootstrap2.forms module
- dash.contrib.layouts.bootstrap2.settings module
- Module contents
- dash.contrib.layouts.windows8 package
- Module contents
- Subpackages
- dash.contrib.plugins package
- Subpackages
- dash.contrib.plugins.dummy package
- dash.contrib.plugins.image package
- Submodules
- dash.contrib.plugins.image.apps module
- dash.contrib.plugins.image.conf module
- dash.contrib.plugins.image.dash_plugins module
- dash.contrib.plugins.image.dash_widgets module
- dash.contrib.plugins.image.defaults module
- dash.contrib.plugins.image.forms module
- dash.contrib.plugins.image.helpers module
- dash.contrib.plugins.image.settings module
- Module contents
- dash.contrib.plugins.memo package
- dash.contrib.plugins.rss_feed package
- Subpackages
- Submodules
- dash.contrib.plugins.rss_feed.apps module
- dash.contrib.plugins.rss_feed.dash_plugins module
- dash.contrib.plugins.rss_feed.dash_widgets module
- dash.contrib.plugins.rss_feed.defaults module
- dash.contrib.plugins.rss_feed.forms module
- dash.contrib.plugins.rss_feed.helpers module
- dash.contrib.plugins.rss_feed.urls module
- dash.contrib.plugins.rss_feed.views module
- Module contents
- dash.contrib.plugins.url package
- Submodules
- dash.contrib.plugins.url.admin module
- dash.contrib.plugins.url.apps module
- dash.contrib.plugins.url.conf module
- dash.contrib.plugins.url.dash_plugins module
- dash.contrib.plugins.url.dash_widgets module
- dash.contrib.plugins.url.defaults module
- dash.contrib.plugins.url.forms module
- dash.contrib.plugins.url.models module
- dash.contrib.plugins.url.settings module
- Module contents
- dash.contrib.plugins.video package
- dash.contrib.plugins.weather package
- Submodules
- dash.contrib.plugins.weather.apps module
- dash.contrib.plugins.weather.conf module
- dash.contrib.plugins.weather.dash_plugins module
- dash.contrib.plugins.weather.dash_widgets module
- dash.contrib.plugins.weather.defaults module
- dash.contrib.plugins.weather.forms module
- dash.contrib.plugins.weather.settings module
- Module contents
- Module contents
- Subpackages
- Module contents
- Subpackages
- dash.lib package
- dash.management package
- dash.templatetags package
- dash.contrib package
- Submodules
- dash.admin module
- dash.base module
- dash.clipboard module
- dash.compat module
- dash.conf module
- dash.constants module
- dash.decorators module
- dash.defaults module
- dash.discover module
- dash.exceptions module
- dash.factory module
- dash.fields module
- dash.forms module
- dash.helpers module
- dash.json_package module
- dash.models module
- dash.settings module
- dash.tests module
- dash.urls module
- dash.utils module
- dash.views module
- dash.widgets module
- Module contents
- Subpackages